Quick Masks Tool
In this tutorial you can learn to use the quick masks combined with the Adjustments to create imressive results and make photoreallistic your photos.
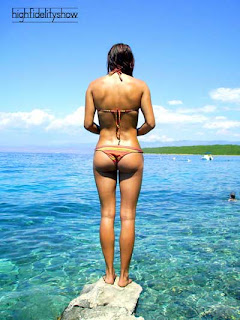
I have chosen this very nice photo from the web.
 |
| Original Photo |
1. Select the Quick Masks. It is the last icon below from the toolbar on the left.
2. Double Click. On the Quick Masks Options put Color Indicates: Selected Areas and Opacity to 40% so that we can watch what happens below the mask. Click OK
3. Select the Brush Tool. We will “paint” the areas that we want to change with the Adjustments.
4. Change the size of the brush suitably (with [ and ] keys). Zoom in and out with “Ctrl +” or “Ctrl –“ so that you can see the right size of the photo.
5. Brush the areas that you are interested.
6. In case you make any mistake or you want to correct something, just change the color to white and brush with it so that you erase your mistake.
7. When you are done click again on the Quick Masks Tool. You will see the selected areas.
8. Press Ctrl – J to create a copy layer with your selection.
9. Go to Filter – Other – High Pass. Value something like 1.5
10. Now you can change how your mask will sit on top of your layer. You can try something like Hard Light, Soft Light,.. I choose Color Burn.
11. Ctrl – J on your mask layer.
12. Select > Refine Edge. Radius = 1, Smooth = 10 and Feather=35.
13. Go to Adjustments > Levels and make the colors more vivid.
 |
| The girl is Sun Burned!! |
In the same way we continue to select other areas to change tottaly the picture.
Tip! You should choose areas with the same colors or areas with the same light to make better results.
 |
| Tottaly different from the original picture. |


Σχόλια